Sunrise King / Unsplash

Not so long ago a new version of the operating system, Windows 11, came out in the world. It provided its users with a fairly wide range of different customization and interesting features that allow you to customize your computer to your personal needs.

However, it is only the external accessories that can really reveal the full potential of your device. For example, if you install an additional monitor, it will give you a lot of features that can simplify your work or improve the user experience. Even in this case, the company provides users with the ability to separately configure certain functions on the external monitors only. For example, many people wonder how they can remove the taskbar on their second monitor.

Can I remove the taskbar on the secondary monitor in Windows 11

Windows 11 offered users a new look at many elements of the Windows interface. However, not all users were delighted with it. In particular, there were a lot of complaints about the updated taskbar. The thing is that now the icons are centered, similar to how it is done in macOS. However, not everyone knows that there is a way to revert to the old labels. Besides, there are many built-in features in Windows which allow you to customize the taskbar and the rest of the system.

Specifically, you can customize an additional monitor. If you work with 2 or more monitors, you can enable or disable some interface elements on your particular monitor. This also applies to the taskbar.

Some users have noted that the taskbar on additional monitors can be distracting and unnecessary, so people are increasingly asking how they can turn it off. In fact, you can do this using the built-in features on your Windows 11 PC.

Read also:

Why you might need to remove the taskbar

There may be several different reasons why you might want to remove the taskbar from your second monitor on your Windows 11 PC.

To start with, on secondary monitors, the taskbar serves more of an additional function. This means that, for example, you won’t have access to the calendar section, the list of running apps, or additional features such as an on-screen keyboard on a secondary monitor.

Another reason why you might want to remove the taskbar from your desktop on a second monitor is that it can be used for various presentations or work. Not all apps support full-screen mode, and you must agree that it would be much more comfortable if you had a full-screen window and no distracting black bar at the bottom of the taskbar.

Last but not least, in my opinion, is that if you have a lot of monitors then this way you can immediately see where the main screen is. Let’s say you work a lot with different spreadsheets, streaming or you just like to have all the information you need around you. In this case, you can have 3 or even more monitors. Once you remove the taskbar on all additional monitors, you can instantly see where the main monitor is in a moment by the taskbar’s presence. That’s pretty handy.

What you need to do to remove the taskbar on a secondary monitor

As described above, actually hiding the taskbar from the secondary monitor is quite a simple action. To do this, you just need to use the built-in features of your Windows 11. To do this, you need to:

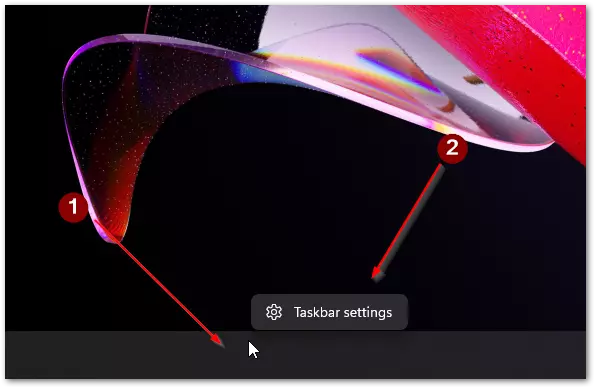
  • First, hover your mouse over the taskbar and right-click on it, select Taskbar Settings from the pop-up menu.
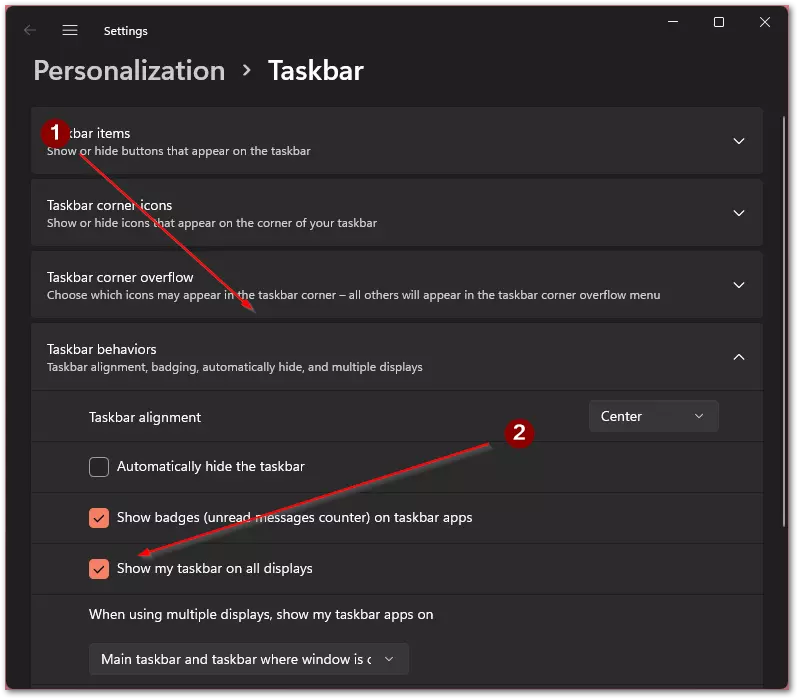
  • This will take you to the Taskbar settings menu. Swipe down to Taskbar Behavior and click on it.
  • In the menu that pops up, you need to uncheck Show my taskbar on all displays.

After that, the taskbar will disappear from all additional screens connected to your PC. As you can see it is quite easy to do. To return the taskbar to the additional screens you just need to check this item again.

How can you customize a taskbar in Windows 11

In addition to simply removing the taskbar, you also have several options for editing it. In fact, you can customize the taskbar in many different ways. Not all of them will be presented in this menu. However, I do want to mention what I think are the most interesting ones.

The ability to add an on-screen keyboard. This is where you will find the Touch Keyboard item in the Taskbar corner icons section. If you enable it, an icon with a keyboard will appear in the lower right corner of the taskbar. Clicking on it will launch the on-screen keyboard and you can type using the mouse, or taps if you have a touch screen.

In addition, upper in the Taskbar items section you can also add a Search button and Widgets to your taskbar. Accordingly, you can use the search to find any option or folder on your computer. And widgets will give you quick access to useful information such as the latest news and weather reports.

Another very cool feature is the Taskbar corner overflow. You must have noticed that some apps running in the background are hidden on the right side of your screen, and then to bring them up you need to click on the up arrow and select the desired one in a pop-up menu. This setting will lock the desired apps right on the Taskbar, so you can get the fastest access to useful apps.

Read also:

How to customize a secondary monitor in Windows 11

If you used dual-screen on your PC or laptop with Windows 10, you know that there were different settings to customize the additional monitor. In the case of Windows 11, the situation is the same. You still have a few options that you can change to make your user experience better. In order to open the monitor settings you need:

  • Use the start menu to enter the Settings or just press the “Win + I” key combination.
  • Next, in Settings, select System
  • Here you can find and select from the list Display

In front of you will get a menu where you can choose which monitor will be the main, also here you can change the brightness, adjust Hertzka, adjust HDR, and much more. You can also adjust the scale and resolution of the displays. And make different displays with different scales and resolutions. This can be very convenient if you have displays with different technical characteristics.

Previous articleHow to use YouTube Premium on Roku
Next articleHow to make a spoiler tag in Telegram

LEAVE A REPLY

Please enter your comment!
Please enter your name here