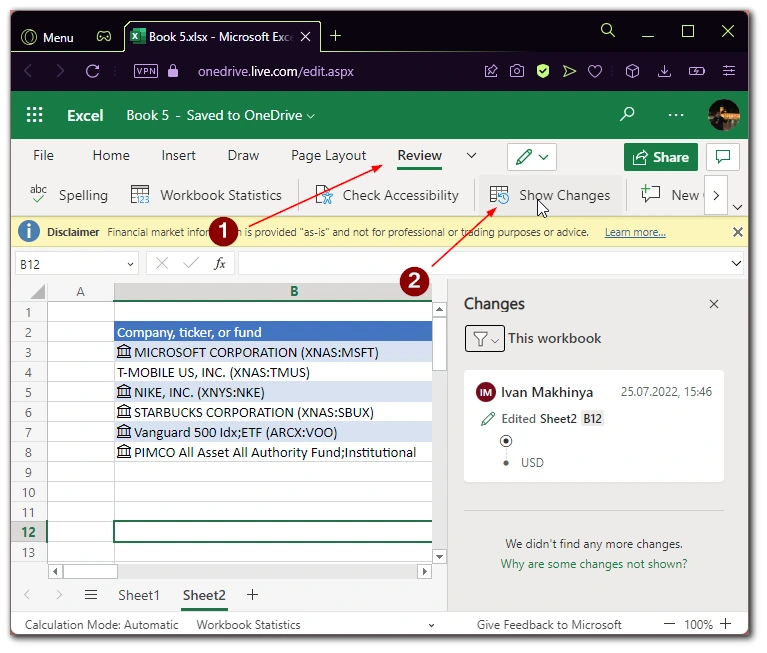
With the development of Microsoft Office technology, quite a few different features have appeared. Today you can work together with your colleague on the same document at the same time. In this case, it can be useful for you to see the history of changes in Microsoft Excel.
Of course, it can also be useful for users who work on a document on their own. You may need it to bring back an old version of a document or just to see when and who made changes to a spreadsheet.
How to view the change history in the whole Microsoft Excel table
In Microsoft Excel, you can see the complete history of changes in the document. This means that you will have access to all the changes. You will see a list showing all the changes. In order to find this list you need to:
- Open your Microsoft Excel spreadsheet.
- Here, go to the Review tab.
- In the top toolbar, click Show Changes.
You will see a popup menu on the side. Here you can choose to sort, such as show changes to just a single area, to individual pages, or to the entire document. Also, clicking on the desired change will take you to the cell where the change was made. You can see the changes in the Excel web version, the Excel app for Microsoft 365, or the Excel mobile app.
How to view the changes history in one cell
Also, if you are interested in changes to one particular cell, you can see the history of changes to one cell. To do this you need to:
- Select the cell you want.
- Right-click on your cell.
- In the end, click on Show Changes in the pop-up list.
With this feature, you will see all the changes that have been made to that particular cell. You can also see the author of the changes and the text that was edited.


