To take full advantage of your computer you will need to use external devices. You will agree that it is much more pleasant to listen to music on a good sound system with high-quality sound. In order to set up this hardware so that it works properly on your Windows 11 system, you may need drivers.
Since Windows 11 is a new and fairly advanced system, it usually automatically installs all the drivers you need for any hardware you connect to your PC. However, there are cases where the drivers aren’t installed or are installed incorrectly. In addition to this for some devices, Windows simply can’t load drivers automatically. Therefore, you will definitely need the skill of installing drivers manually on your Windows 11.
What are drivers in Windows 11
Your home computer is actually a very complex device that can perform hundreds of different operations simultaneously. However, you still need external devices to really unleash its full potential.
For example a good headset, a keyboard, or a computer mouse. It’s not hard to guess that all this computer equipment needs a special setup to work correctly. It is in this situation that you will need drivers on your PC.
A driver is an essentially special software with which your operating system gets access to control an external or hardware device. Accordingly, if you connect a new device, the driver must be automatically installed on your PC so that the device can operate correctly.
If the drivers are out of date or have not been installed correctly, you may experience problems such as the sound of your microphone being too quiet. Of course, Windows 11 should automatically install most drivers, but if you have a situation where a driver isn’t automatically installed or you want to install it manually, it’s not that difficult. You can use both the built-in tools in your Windows and third-party programs to do this.
Read also:
- How to clean cache on Windows 11
- How to enable/disable user account control (UAC) in Windows 11
- How to change or customize the mouse cursor on Windows 11
What you need to do to install the driver in Windows 11
If you come to the point where you need to update your driver or install a new one, there are several ways to do this. I can recommend you the 3 easiest and most proven ways to install the driver of the device you need. These are updating through windows settings, updating through device manager, and using official apps.
Installing with Windows Settings
There is a way to install optional drivers using the settings on your computer. It’s easy to do and it doesn’t take much of your time. For this you need:
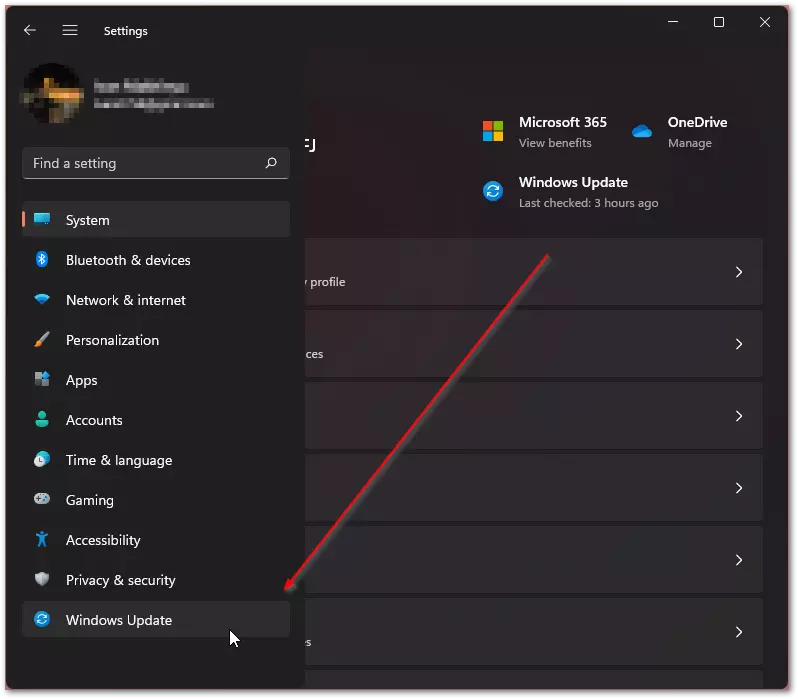
- Go to Settings with the Start menu or the [Win+I] key combination
- Then you need to select Windows Update from the menu
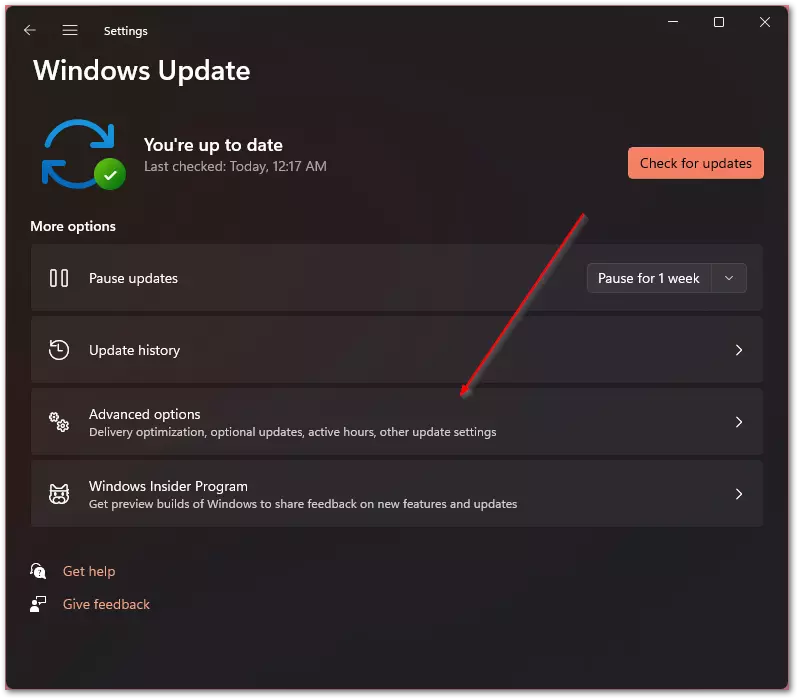
- Here click on Advanced Options
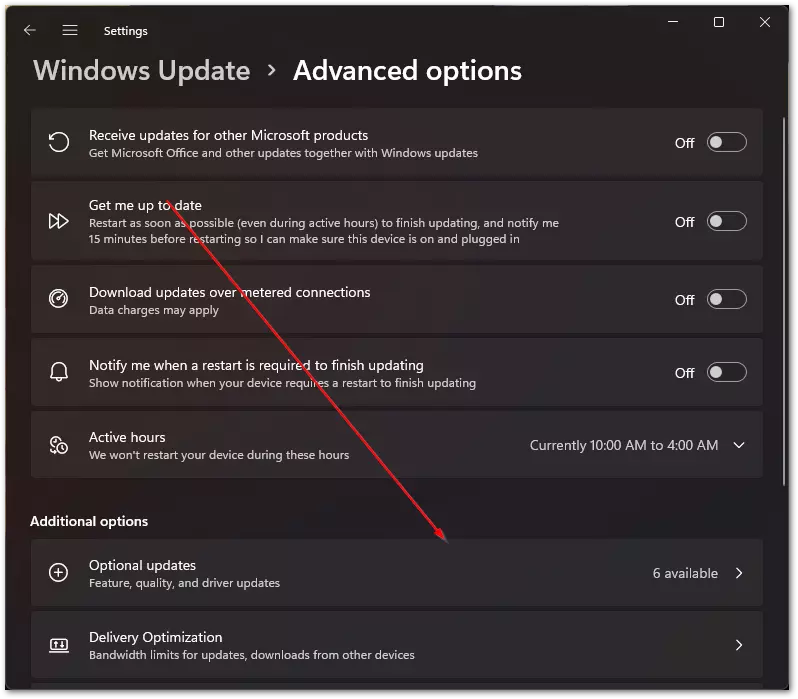
- After that, go to the Optional Updates menu.
- Under the Driver Updates tab, you will be able to find the drivers that Windows found but didn’t install. You just need to highlight the ones you want and click on the Download and Install button.
In this way, you can install drivers that your system was able to detect on its own, but have not yet had time to install. Remember that these drivers will still be installed in the next automatic Windows update.
Installing with the device manager
You can also download the driver you need from the official website of your PC or hardware manufacturer. For example, Microsoft has a pretty handy page where the most popular drivers for their devices are collected. Then you can install this driver manually by simply entering the path to it on your hard drive. To do this:
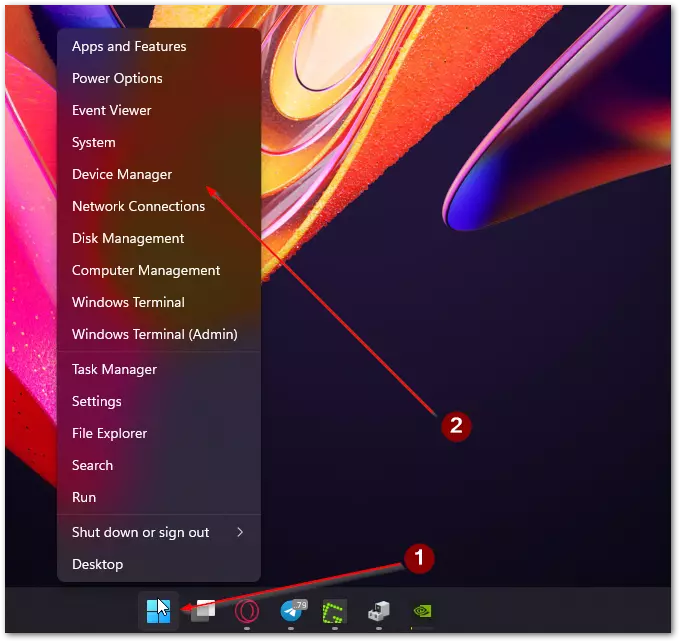
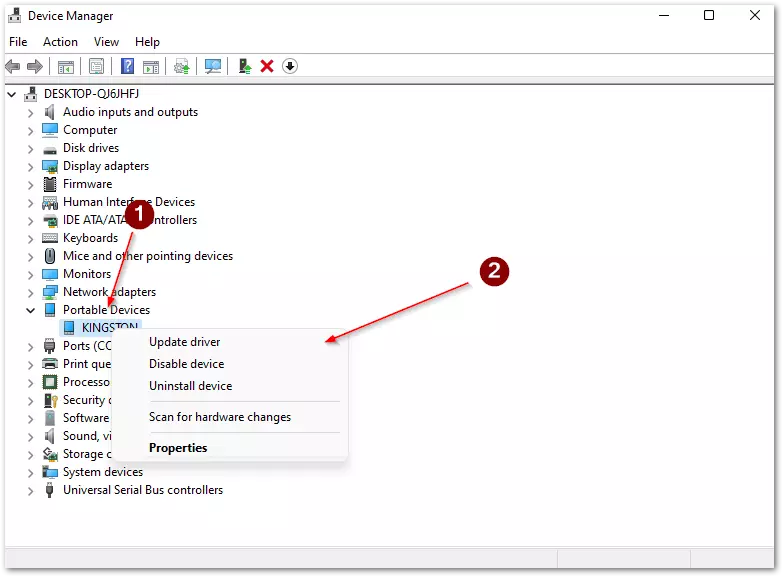
- Right-click on the Start icon and select Device Manager from the pop-up menu
- Then you need to find the desired device in the list of devices and right-click on it. In the pop-up menu select Update Driver.
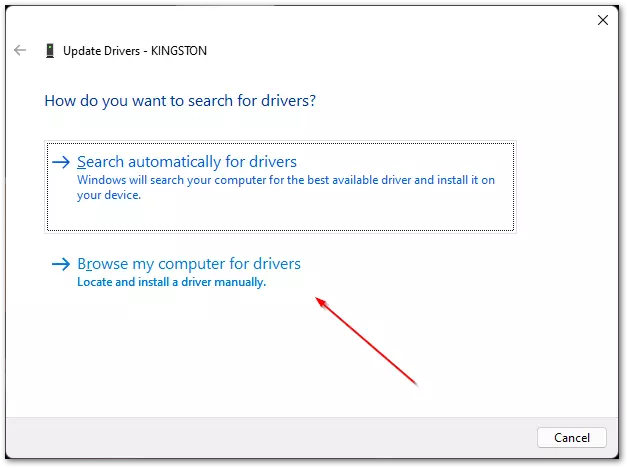
- In the next menu select Browse my computer for drivers.
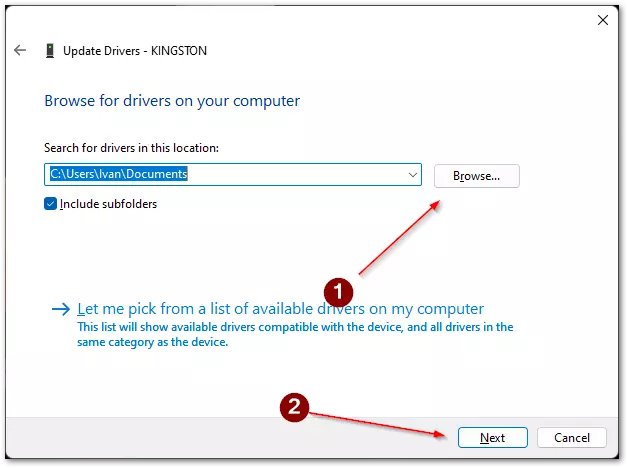
- Here you only have to specify the path to the desired driver and follow the instructions.
In this way you can manually install any driver that you download from the manufacturer’s website.
Installing the driver using a third-party app
Another way to install drivers quickly and reliably is to install them using special apps provided to you by the developer of the devices. For example, this method is often used when you’re setting up speakers with surround sound.
To do this, you need to download the official app and follow the instructions in it. For example, installing the driver for Nvidia graphics cards looks like this:
- Open GeForce Experience.
- Once you open the app the driver installation will start automatically.
- Otherwise, you will need to click on the Download and Install button on the right side of the Drivers tab.
As you can see, it’s pretty easy to do. Most apps from official manufacturers will start installing drivers automatically as soon as you open their program, so you usually don’t have to worry much about how to install their drivers.
Why you might need to install or update drivers
In fact, the reasons for manually installing drivers may be different, but I would divide them into 3 categories. The first is that the device doesn’t work, the second is that the device doesn’t work properly and the third is that some features of the device don’t work at all or don’t work at full capacity.
Sometimes it happens that after you plug a device into your system, nothing happens. It just won’t start and refuses to work. The first thing you should check is if the drivers are installed correctly. In the past, drivers used to come with the device on a disk, but today you can simply download the driver from the official website of the manufacturer of any device.
The next unpleasant situation that can happen to you is bugs and crashes when using your hardware. In this case, you should also check whether you have the latest driver installed because developers often release new versions of drivers which fix many bugs that have appeared.
Other than that, there are often performance problems. Usually, these problems are in the hardware of your PC. For example, if you don’t have the latest video card driver installed, some games may be slow and unstable. In this case, updating the driver should help to solve the problem.
How often you should update drivers
Regarding how often you need to check for new drivers and update them, the answer will depend on the type of device you have. For example, if it’s a mouse of an older model for which updates are unlikely to be released in the near future, it makes no sense to check very often.
However, on the other hand, if you often play video games, you should regularly check for new updates for your video card, as with many major releases developers release special drivers that help new games work even better.
I would advise you to check your drivers once a month if you aren’t experiencing any problems or bugs. If you notice that your pc is slower or you have bugs or bugs that didn’t exist before, you should first check if there are any new drivers for you.
Read also:
- Does your PC or laptop support Windows 11
- Access is denied Windows 10/11 error
- How to fix can’t play sound with HDMI Windows 11
How to reinstall drivers in Windows 11
If installing the driver didn’t help you to solve the problem, or even made it worse, it is a good idea to uninstall the driver and reinstall it. In that case, you will need to use the device manager again. To do this, you will need to:
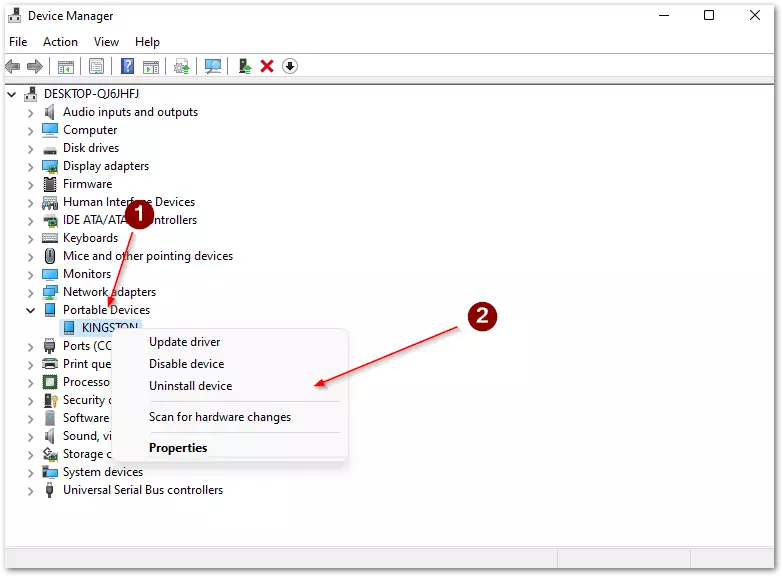
- Open the device manager.
- Then you need to find the device you want and right-click the popup menu. Select the Uninstall Device option.
- At the end, you should click Uninstall to confirm.
Then you need to reboot your PC and install the driver following the instruction above. Also after restarting Windows will find and download the right driver, so first, you should check if you can fix the problem with this method and then you can install the drivers manually.


